Following the previous article “The Boring Flutter Architecture”, here’s a coding example to explain how we actually structure our code.
📝 Assignment
Build a User Avatar feature that meets the following requirements:
- 📸 Display User Avatar
- 🔄 Allow users to edit their Avatar
- 🎉 Show a success toast notification when changed successfully
- ⚠️ Show a failure toast notification when an error occurs
- ✨ Optimize caching: avoid unnecessary API reloads
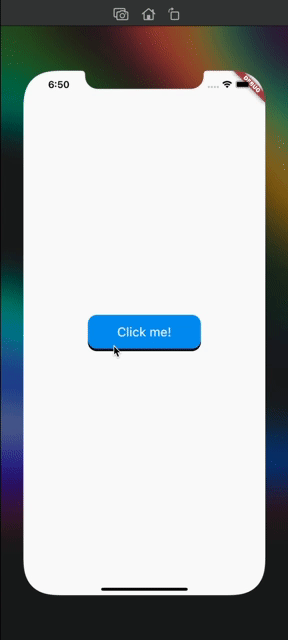
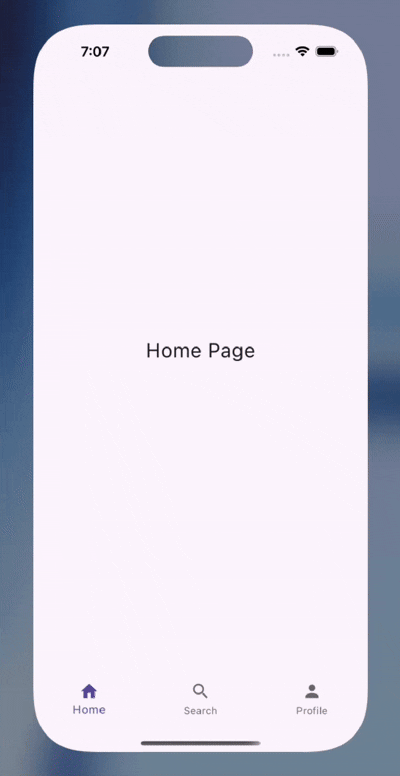
✅ Solution — Demo
🧑🏻💻 Let’s Start!
Imagine we have a User Information page displaying a user’s avatar. We need to implement a logic for changing the avatar.
Assume that this is your task in a company that has +20 devs, all working on the same app, so you have to keep in mind that you don’t refactor/alter other codes, to avoid getting fired!
First, let’s check out the User Information Screen:
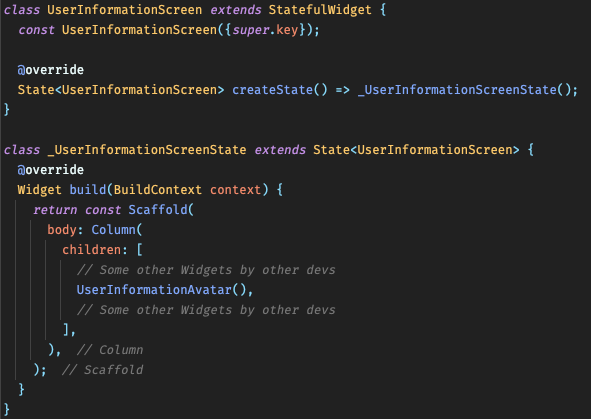
As you can see, all we did is adding the widget that’s responsible for displaying the Avatar and will include inside it all requirements.
Next, the actual widget that we care about, the UserInformationAvatar
🌟 User Information Avatar Widget
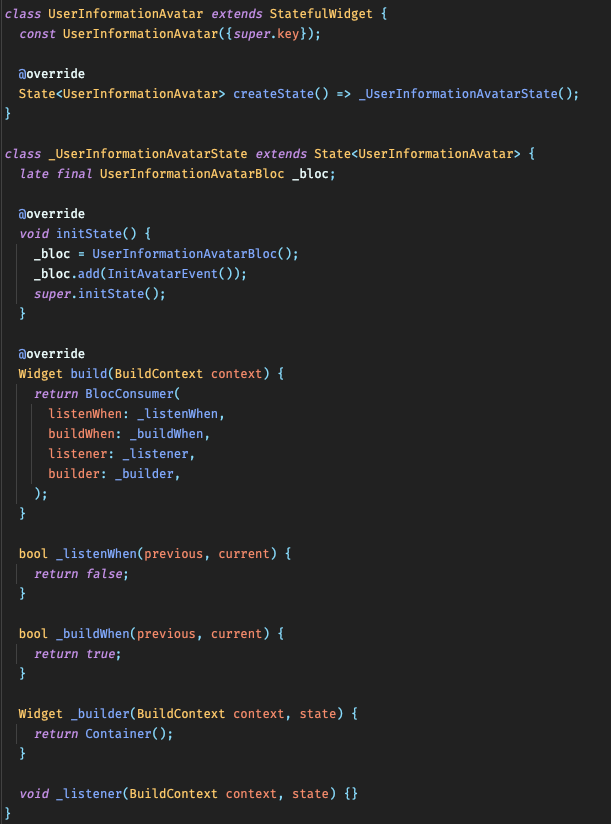
⚠️ Attention!
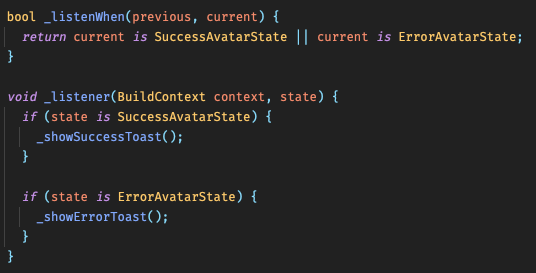
- We’re using BlocConsumer with
listenWhen&buildWhenwhich are probably forgotten by you, but there’re extremely useful to reduce unwanted builds → improve performance. - There should be NO state that exist in both
listenWhenandbuildWhen, that defy their purpose. - Always write clean code — extract functions whenever possible!
As you can see, the above code is not complete yet, you can think of it as the boilerplate for any widget that might use a bloc.
So, to complete the code above, we actually need to write the Bloc code, so let’s do it!
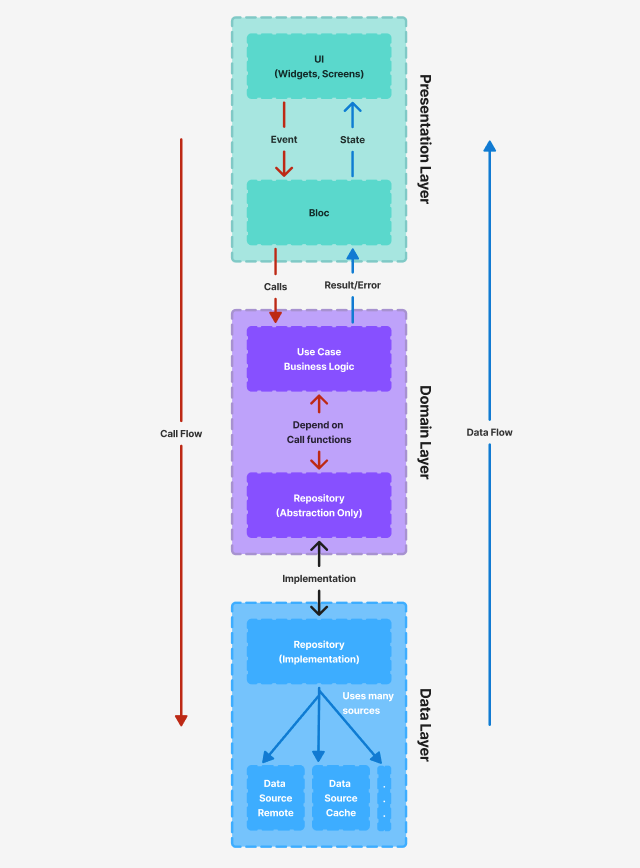
🎮 Flutter BLoC Structure
In Flutter, BLoC consists of three main files:
- bloc.dart (handles logic)
- event.dart (dispatched from UI)
- state.dart (emitted from bloc to UI)
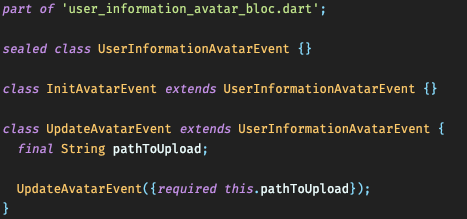
Let’s think of the events, in order to properly achieve the requested task, we need to load & update the user avatar, so we need those events:
- InitEvent (called when we request the avatar… when accessing the widget for the first time)
- UpdateEvent (when changing the avatar, passing to the bloc the new file path to upload)
So, our events will be like this:
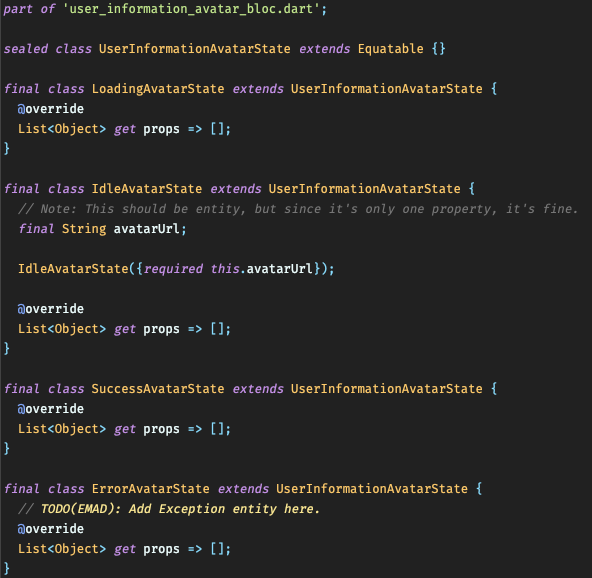
Next, the states, which will be emitted to the UI holding data to view. As per the requirements, we need to show the avatar and show notifications (success, error)
So, our states will be like this:
💡 Pro tip; Don’t do the following…
Notice that we have two states for the toast notification, success & error.
Some devs might combine them into one state, and passing a flag to determine whether it’s a success or failure notification.
Keep in mind to separate functionality and purpose of each component/class/function.
Implementing the BLoC
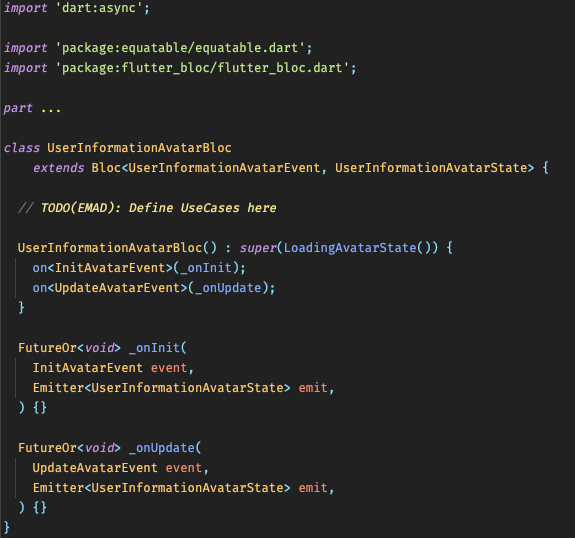
simple as that!
And with this, the Presentation layer is done. Don’t worry, we’ll visit it later to implement UseCases.
📚 Next, the Domain Layer
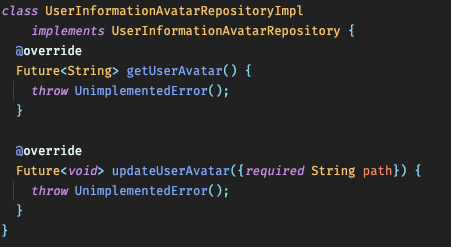
As per the previous article (link at top), we know what goes inside this layer, so let’s start by Repository Interface.
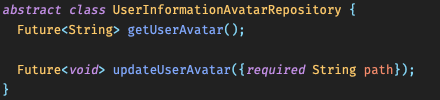
This is just an interface (abstract class) — the actual implementation happens in the Data Layer.
Next, the UseCases… We know that we need to get & update the avatar, so we’ll need two UseCases.
GetAvatarUseCase

UpdateAvatarUseCase
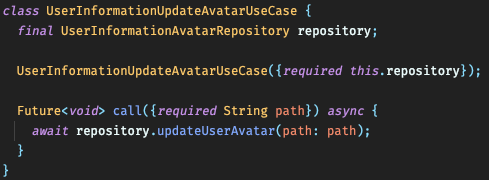
See how each UseCase does only one functionality? Nice and clean! ✨
That’s it! We’re done here!
Now we have the Domain Layer code, let’s go back to Presentation Layer to adjust the bloc code…
(When you become professional at this, you’ll start the Domain Layer at first, even without knowing the UI looks, scary!)
💡 Presentation Layer… Revisit
If you have a memory of a fish (like me), then I’ll remind you that we’re still missing the UseCases in bloc implementation, so it will become like this:
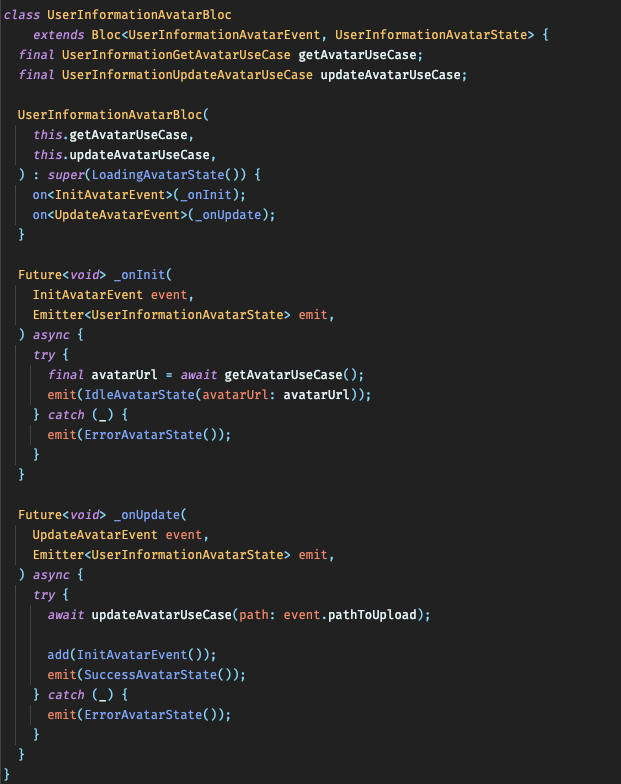
Let’s get serious a bit, because there are couple things I need you to fully understand

In previous code, we’re calling the useCase that return the avatar url, and that’s good and enough, and in case of error, just emit the ErrorAvatarState.
But on the other hand, you’ll notice a weird thing happening in the update code:
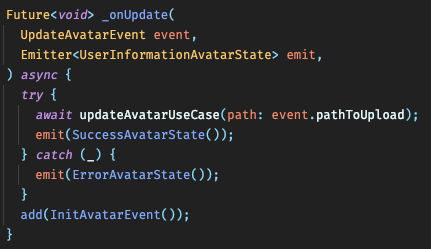
Why are we adding the Init event at the end?
Actually, that because of many things:
- Separation: again, we should separate much as possible.
- Independent from BE logic: what if when you submit new image to the Backend, it just return a success? without the new url?
- In case of error: we depend on the Init event to always grant us a working url, regardless of the data source, which will ease our update functionality.
📺 UI Changes
Let’s move to the UI changes:
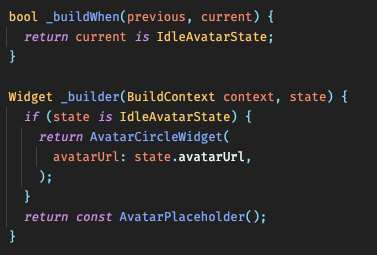
First, we know that our data will only be in the IdleState, so we don’t really need to rebuild the widget tree except for this state.
That’s why we’re telling the bloc “Only build when you see this state”. This will help you minimize rebuilds and optimize your app performance.
Next, since the notification toast only shows on success or error states, then we tell the bloc to only listen for those states, like this:
That’s it! We’ve officially finished the Domain & Presentation Layers!
Time to fetch the data and complete our feature!
📝 Data Layer Implementation
Following our task’s flow, we need to pay attention to the following:
- Caching the current url.
- Submitting new url when updating the avatar.
- Getting the url on first build of the avatar widget.
To do those requirements, we’ll start by implementing the our Repository:
If you still remember the last article, then you know that the repository handles and manages all different data sources and there’s no connection between them.
So, let’s write the Data Sources first…
We need two data sources, one for API, the other for Caching (you can use Shared Preferences or Local DB, but for simplicity, I’ll just use a class that holds data as cache)
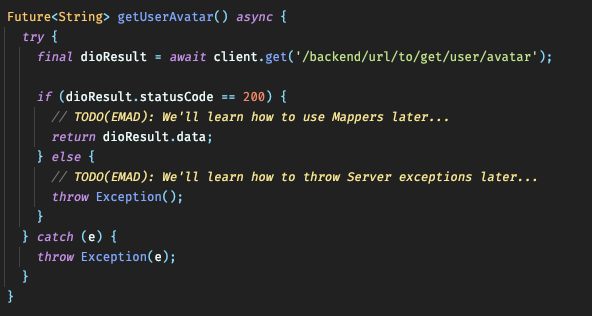
🌀 Data Source — API
First, the Get avatar function:
Then we have the Update avatar function:
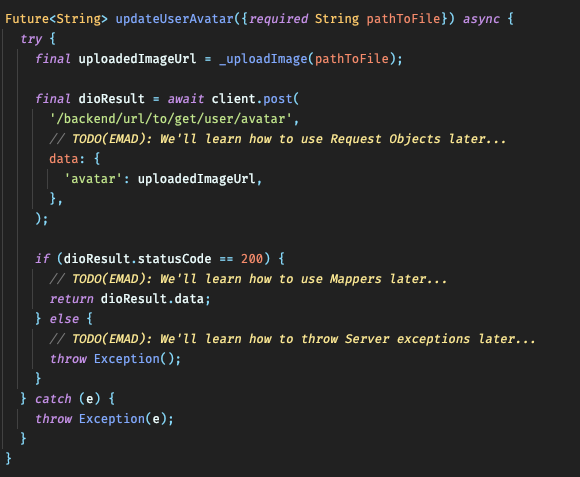
💬 Note: You might noticed that we have many todos… those are for another article (out of scope now)
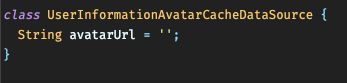
🔐 Data Source — Cache
We only need to cache the avatar url, so it will be as simple as follows:
🎉 That’s it! Let’s head back to the Repository Implementation!
Let’s use the data sources inside the Repository Implementation:
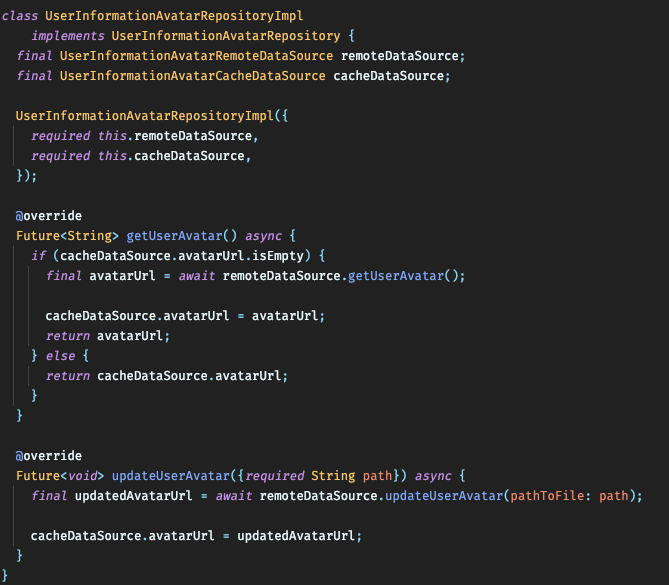
Notice how we manage the cache after we successfully get the image, keeping it fresh and always get the cached result if it’s not empty.
Next, let’s do the… wait! We’re done! Simple, right?
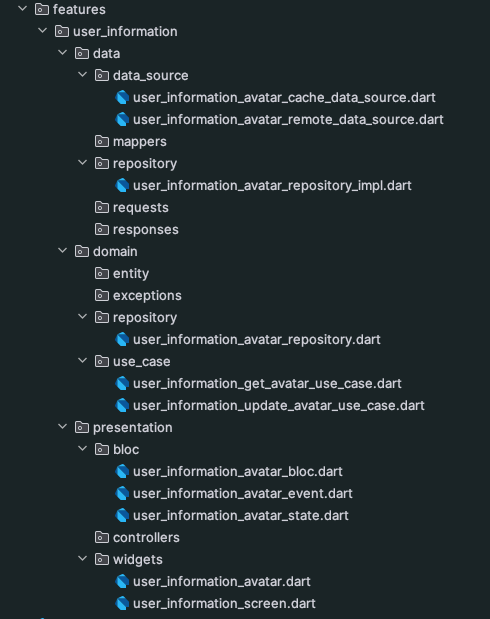
Let’s have a look on the files structure:
🔄 Final Folder Structure
Some may argue this is overkill for a simple feature. But trust me, once you work like this, you’ll love it! ❤️
🚀 Task Recap
Let’s recap our task and see if we’ve done all the requirements:
Build a User Avatar feature that will respect the following requirements:
- ✅ Display User Avatar (done, using GetAvatarUseCase)
- ✅ Allow to edit the Avatar (done, using UpdateAvatarUseCase)
- ✅ Show a success toast notification when successfully changed (done, using SuccessState)
- ✅ Show a failure toast notification when an error while changing the avatar (done, using ErrorState)
- ✅ Optimize; cache the image, don’t reload it from API unless required (done, using Repository & Cache Data Source)
Assignment code…
Here’s the link to Github Repo, enjoy!
Ready for part 2? Check the next article.
previous article “The Boring Flutter Architecture”
🎤 See You in the Next Article!
Cheers! 🎉